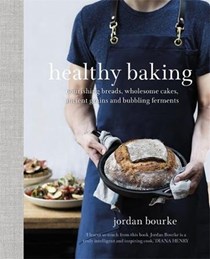
 Healthy Baking: Nourishing
Breads, Wholesome Cakes, Ancient Grains and Bubbling Ferments
by Jordan Bourke is more than a beautiful baking book with an
eye toward healthful alternatives. It also includes recipes devoted
to savoury dishes such as Baked Sweet Potato and Beetroot with
Roasted Freekeh and Salmoriglio and Whole Baked Cauliflower with
Cumin Tahini that are baked.
Healthy Baking: Nourishing
Breads, Wholesome Cakes, Ancient Grains and Bubbling Ferments
by Jordan Bourke is more than a beautiful baking book with an
eye toward healthful alternatives. It also includes recipes devoted
to savoury dishes such as Baked Sweet Potato and Beetroot with
Roasted Freekeh and Salmoriglio and Whole Baked Cauliflower with
Cumin Tahini that are baked.
Bourke is the author of the award-winning title, Our
Korean Kitchen, which was written with Rejina Pyo, his
wife, and shares 100 dishes, from Korean staples such as bibimbap
and kimchi to stir-fried spicy squid, sesame & soy-marinated
beef and pecan & cinnamon-stuffed pancakes.
Healthy Baking shares a wide variety of
mindful recipes that are unique and tempting some with an
international touch such as a Kimchi Sourdough. Other recipes
shared are Red Onion, Girolles and Pine Nut Tart which is not only
visually stunning but easy to make and good for you with a spelt
pastry crust, Chocolate, Tahini and Pecan Rye Cookies that look
delectable, and Roasted Carrots with Kamut, Thyme, Hazelnuts and
Garlic Yoghurt which look spectacular. Dozens of recipes for
breads, wraps, desserts, tips on grains and other ingredients round
out this delicious title.
Many thanks to Orion Publishing and the author for sharing this
tasty recipe with our members. Please head over to our contest post to enter our giveaway for
three copies of this title open to EYB members worldwide.
 kimchi, egg and avocado on sourdough
This is one of the dishes I make when I am trying to convince
a sceptic that kimchi is one of the best ingredients in the world.
The frying mellows out the sharper, more acidic notes, while adding
in a slightly charred caramelised flavour that is sure to win over
the most ardent kimchi-phobe. It always works. This dish can be
eaten at any time of day. It has all the components of a sublime
weekend breakfast or brunch, but is just as delicious at
dinnertime.
serves 2
2 tbsp olive oil, for frying
200g kimchi, chopped into bite-size pieces
1 tsp honey
½ tsp roasted sesame seed oil
2 eggs
2 large slices of spelt sourdough bread
1 small garlic clove, peeled
extra virgin olive oil, to drizzle
1 avocado, stoned and sliced
80g feta, broken into chunks
sea salt and pepper
Heat 1 tablespoon of the oil in a large frying pan over a high
heat. When very hot, add the kimchi and fry for 3-4 minutes,
stirring from time to time, until it starts
to caramelise. Turn down the heat a little, add the honey and
sesame seed oil and fry for another minute.
Remove from the heat and leave to one side. Heat the remaining
tablespoon of oil in another frying pan over a high heat. When hot
put in the eggs and fry
for 3-4 minutes, until the egg whites are crispy around the
edges and the egg yolks are still a little runny.
Toast the sourdough, then scrape the garlic over the top of
each piece of toast, rubbing it into the surface. Season with a
small pinch of salt and drizzle over
some extra virgin olive oil. Spoon the kimchi over the toast,
and top with the
avocado, fried egg and feta. Season with a little pepper and
serve immediately.
spelt sourdough loaf
I find the most time-efficient way to bake a sourdough loaf is
to start on a weekend evening, finishing it off the following
morning. This recipe makes one large loaf, which is enough to last
my wife and me a week. We keep some fresh, slice up the rest and
freeze it, ready to be thrown into the toaster when needed. Bear in
mind that if you opt for 100 per cent spelt flour, your loaves will
not have the same dramatic oven spring as bread containing wheat
flour, due to the lower quantities of gluten, which gives bread its
structure. However, this does not affect the flavour, so if you are
keen on a 100 per cent spelt flour bread don’t let this fact put
you off.
375ml water
75g active starter
240g wholegrain spelt
flour
300g white spelt flour, or
strong white bread flour
10g salt
rice flour, to dust the proving basket and work surface
1 round proving basket, or a mixing bowl lined with a clean
tea towel
Ovenproof, heavy-based pot with a lid, roughly 22-24cm; a cast
iron pot is ideal
step 1
In a bowl, combine the water and the starter. Don’t worry if
lumps remain in the starter – this is normal. In a second, larger
bowl combine the flours and the salt. Add in the water and starter
mixture and thoroughly mix together, ensuring there are no lumps of
flour. Cover with cling film and leave at room temperature for 1
hour.
step 2
With a very lightly floured hand, to prevent sticking, stretch and
fold the dough. To do this, take a portion of the dough from the
base of the bowl, stretch it up and over and press it into the
opposite side of the dough. Repeat this movement 4 times, turning
the bowl slightly in between each movement so you work your way
around the entire dough – see photos 1 to 4, pages 28-29. Cover and
leave to rest for 15 minutes.
Repeat this process 3 more times, leaving 15 minutes in
between each kneading. The whole process should take 1 hour, but
only about 2 minutes of hands-on time. Once you have finished,
cover the bowl and leave it out at room temperature overnight (or
for at least 8-10 hours). If you live in a very warm climate, place
the bowl in the fridge overnight.
step 3
The following morning the dough should have doubled in size
and feel light and airy to the touch. If you refrigerated the
dough, remove it and leave it to prove at room temperature for a
few hours until it has doubled in size. Liberally dust your proving
basket or bowl lined with a clean tea towel with rice flour. Make
sure it is well coated, otherwise your sourdough will stick when
you turn it out into your baking vessel. (If you are following
these steps for the porridge sourdough or rye & maple
sourdough, scatter the oats or rye flakes in a thin layer on the
base of your proving basket.) Set it aside.
step 4
Lightly dust the work surface with rice flour, and gently tip
the dough out on to it. Use a spatula to help coax all the dough
out, and take care not to knock out too much air. The dough will be
very soft and a little sticky. With floured hands, take 1 edge of
the dough and pull it up and out, then back over itself into the
centre of the dough. Work your way around the dough, repeating this
movement as you go, each time pulling the edge of the dough out and
then back in over itself so that the floured edges are now all
puckered together in the centre, and the bottom surface of the
dough is fully coated in the rice flour, see step photos 5 and 6 on
page 28. The dough should feel a bit tighter at this point.
step 5
Flip the dough over so the puckered surface is facing down. Cup
your hands around the ball of dough and bring them together
underneath the dough, gently pulling the surface of the dough
downwards – see photos 7 and 8 on page 29. Rotate a little and
repeat this movement all the way around the dough until the surface
feels smooth and tight. Transfer it into your proving basket with
the smooth rice flour covered surface facing down and the puckered
surface facing up in the centre. Dust with more rice flour, cover
loosely with a tea towel and leave to rise in a warm spot for 1½
-2½ hours depending on the temperature of your kitchen, until the
dough has noticeably risen, but not doubled in size.
step 6
Thirty minutes before the final rise is complete, put your
cast-iron or heavy-based pot and lid into the oven and preheat to
240°C/220°C fan/Gas mark 9. When the final rise is completed,
carefully remove the pot from the oven and gently, with the support
of your hands so it does not lose its shape, invert the dough out
of the basket and into the pot, so the puckered centre is now
facing the bottom and the smooth surface (or oat/rye covered
surface) is facing up. Take extreme care throughout this process,
as the pot will be burning hot.
step 7
With a small, very sharp knife or blade, cut 2 to 4 shallow
slashes into the surface of the dough, to allow the bread to expand
during baking. Put the lid on the pot and place it in the oven.
Immediately turn the temperature down to 220°C/200°C fan/Gas mark
7.
step 8
Bake the bread for 30 minutes, then remove the lid and bake
for another 10-15 minutes, until the crust is deeply golden brown,
just a few shades shy of being burnt. This is important for both
texture and flavour. To check the bread is cooked
through, tap the base. It should sound hollow. If not, bake
for another few minutes and test again. Once cooked, leave to cool
on a wire rack. Do resist the temptation to dive in while it is
still hot, as this will release all the internal steam and affect
the quality of the crumb. Once it is cool enough to handle, but
still warm enough to melt butter, you can go ahead and slice off a
chunk of your well-earned sourdough.
Add this recipe to your
Bookshelf (click the blue +Bookshelf
button)
HEALTHY BAKING: Nourishing Breads, Wholesome Cakes,
Ancient Grains and Bubbling Ferments by Jordan Bourke is published
by Orion as a hardback & eBook.
Photography (c) Issy Croker